Do I Want To Install My Own Classroom Web Server?
If you don't want to go through the installation process, or you want others on the internet to see your website, you can use a web hosting service. There are many available and some will host a minimal website for free.
Introduction
These instructions will create a web server running on a local classroom (or school) computer. Students will be able to create a website and web pages.
Students will use FileZilla (client and server)
to upload web pages to their website on the server.
Note: A simple web based interface is available if you do not use the
FileZilla client.
These instructions will create a web server running on a local (classroom) computer. At a minimum, you will need to install the Apache web server, PHP, and the FileZilla server.
These instructions assume the following:
- Your are not creating a website to be accessed using the internet
- This is for learning to create web pages and websites
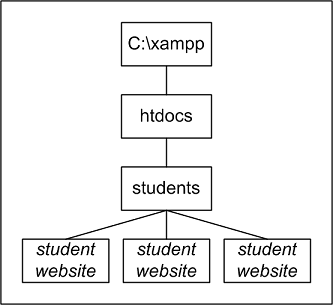
- Student web pages will be installed in sub-directories under the directory (students), which is under the web server's root document directory (htdocs) (see diagram)
- Student websites can be accessed using the IP address of the web server
http://webserveripaddress/students/j Root of student websiteshttp://webserveripaddress/students/studentwebsite/j A student's website - The web server's IP address can be found by executing the ipconfig command
on the web server
see How to find your computer's IP address
FileZilla client and server will be used to upload student web pages to the web server. The FileZilla client will run on the student workstations. The FileZilla server will run on the web server.
Website directory structure
Installation Steps
Step 1. Download, install, and configure XAMPP
Several things will be installed, including:
note: You only need the console, Apache, FileZilla, and PHP.
- XAMPP console
- Apache web server
- PHP
- MySQL
- FileZilla server
- and more
Step 2. Create the root directory for student websites
Create the directory
C:\xampp\htdocs\students\Step 3. Unzip and copy files to the web server
The file are in student_websites_required_files.zip
Copy the files to the directory
C:\xampp\htdocs\students\Step 4. Setup Upload/Delete/List Tools for Each Student
Students will need a method of uploading, deleting, and listing files on the server. There are two ways of doing this.
A. Filezilla ClientThis the best method, however, this may be too complicated for younger students.
Install the FileZilla clients on each student's workstation B. Simpler ToolsWhen a student website is created, the files in the
C:\xampp\htdocs\students\default\directory are copied to the website. This gives the student something to start with.PHP files are included that provided a simple method for maintaining the website (upload/delete/list).
If you do not want to use the simplier method, remove the files from the
C:\xampp\htdocs\students\default\directory, and replace them with a new "index.html" file.Step 5. Create Student Websites
See Classroom Website Operations for more information.